Yes, the new cooking grid has the same specs as the original.
All Grills
MHP
ProFire
Phoenix
Everglow Lighting
All Grills
MHP
Your model and serial number could be located in a couple of places. It depends on which model Modern Home Product grill you own.
- The model & serial number most typically will be located on the left end cap of your control panel.
- Other models will have the serial number located on the underside of slide-out grease tray.
If you do not hear any clicking when you push the ignitor button, it may be time to replace the battery.
To access the battery, unscrew the ignitor push button and collar. Remove the old battery. If you see any corrosion in the battery compartment it can be removed by wrapping a small piece of sand paper around the eraser end of a pencil and using that to scrape off the corrosion.
Install a new AAA battery into the battery compartment, positive (+) side down. Replace the push button and collar.
Below is a video showing how to replace the battery in the electronic ignitor.
The positive side goes down.
Is that peeling paint on the inside of the grill lid?
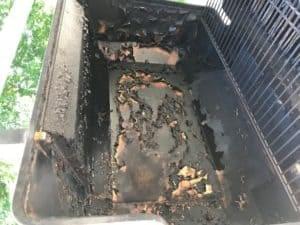
Example of grease build-up on the inside of the grill
There is no paint applied on the inside of your grill lid and not used on the inside of our grills due to the fact that paint is flammable and toxic. What you are seeing is a carbon and grease build-up on the inside of your grill. Remarkably it does resemble the look of peeling paint, but it is simply residue that can be scraped off. There are several ways that your grill lid can be cleaned.
- You can use a wadded up ball of aluminum foil, or a plastic flat blade putty knife to scrape off the majority of the food build-up. The loosened material can be removed with a shop vac.
- You can also take the removal a step further if you would like and use a brass wire wheel to remove any excess residue left in the casting.
- You can also use a garden hose to remove some of the material, but if you do this, first you will need to remove the briquettes and cover your collector box & electrode with aluminum foil so they don’t get wet. After cleaning, once the grill is dry, remove the foil from the collector box and put the briquettes back in place.
- The inside of the grill lid can also be power washed, but you will want to remove the top casting from the grill before you do this, so the water doesn’t damage the ignitor or break the briquettes, or tip the grill over.
No, you should not spray grilling spray on your cooking grids. The grilling spray will burn to your grids and leave a gummy yellow coating that is very hard to remove and cause your food to stick even worse.
If you smell gas and the grill will not ignite you will need to check a couple of things.
- Is my ignitor sparking? You may need to check and replace your battery if you don’t hear a clicking sound.
- If your ignitor module is sparking and your grill still won’t ignite you will need to make sure your wires are secured properly.
- If your ignitor module is sparking and your wires are secured properly you will not need to make sure your ignitor box has not rusted away by your burner.
- If your grill still will not ignite with your ignition system your grill is equipped with a safe alternate method of lighting.
- You may need to light your with a long lighter through the hole that is located in the bottom casting directly under your right side shelf.
- First, put the lighter in the hole and ignite then ignite it once it is near your burner.
- Then turn the right valve knob to the “high” position.
- Finally turn the left valve knob to the “high” position and preheat your grill for 10 minutes.
- Bring on the BEEF
If you have any questions or concerns about your grill, please do not hesitate to contact one of our knowledgeable customer service agents.
Burners are going to rust due to the high heat, salt, and food drippings. This surface rust is not reason enough to replace your burner, however. Your annual maintenance should include a thorough investigation and cleaning of your burner. When you take your burner out you should remove the surface rust on the burner with a wire brush.
Below are several problems that will indicate your burner needs to be replaced.
- Large gaping holes on the underside of your burner rather than individual round ports.
- Leg pins and blocks fell out of the bottom of your burner.
- Split seams along the edge of your burner.
If you are unsure if your burner needs to be replaced, please do not hesitate to contact one of our knowledgeable customer service agents.
Example of a burner with gaping holes on the burner
Example of a burner with missing or broken leg pins
Example of a burner with split seams along the bottom of the burner
For painting the outside of your cast aluminum grill, we recommend choosing a good quality high-temperature paint specifically designed for use on metal surfaces.
When repainting the outside of your grill you want to make sure that you remove all the grease and debris thoroughly to ensure that your paint adheres properly to the following steps.
- Tape off or remove anything you do not want to paint on your grill. (control panel, logos, handle, etc…)
- Wash the grill with hot soapy water, rinse, and dry.
- Use a degreaser and then steel wool.
- Wipe down the grill with a lint-free cloth before painting with a high-temp grill paint.
Yes! Anodized aluminum is perfectly safe to cook on.
Exposures to aluminum through food can occur when aluminum leaches or otherwise dissolves from the cookware into the food. Leaching is most likely when the foods being cooked or stored are highly basic (like baking soda) or highly acidic (like tomato sauce, lemon juice, oranges, or vinegar). For example, tomato sauce has been shown to contain 3-6 mg aluminum (per 100 g serving) after cooking in aluminum pans, which translates into about one-tenth of the typical daily intake. This leaching of aluminum with acidic foods does not happen with aluminum cookware that is anodized or electrochemically processed to seal the aluminum in the cookware. Clemson University Extension’s Home and Garden Information Center tested different cookware types and found anodized aluminum cookware to be safe.
In some areas of the country, spiders or small insects have been found to create “flashback” problems. The spiders spin webs and/or insects build nests in the grill’s venturi tube(s). The web and/or nests can lead to gas flow obstruction which results in a “flashback” (a fire in the venturi tube(s). See illustration below.
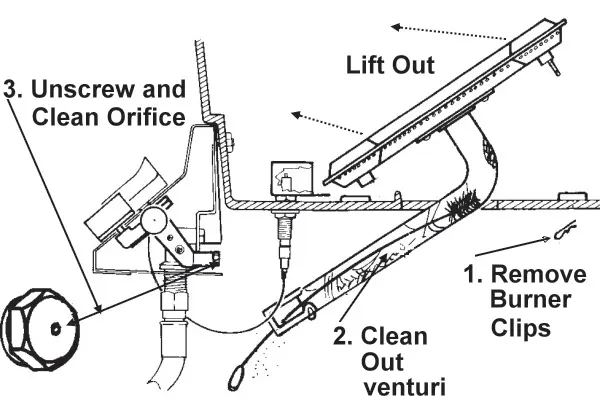
The grill may still light, but the obstruction does not allow full gas flow to the burner. Therefore, some gas will back up and escape at the venturi shutter. This will ignite, causing flashbacks, which also could damage your grill.
To remove spider webs and/or other obstructions, you must remove the burner and clean out the venturis with the long narrow bottle brush supplied with the grill. This should be done routinely after the grill has set idle for extended periods.
- Be sure the grill is cold. Open the lid and remove the cooking grids, the porcelain briquettes and the briquette grate.
- Under the grill, remove the clips holding the burner in place.
- Lift the burner and venturi assembly out. With the bottle brush supplied, or a pipe cleaner or long flexible wire, clean out the venturi tubes.
- Remove the hex head orifice with a 3/8″ wrench. Clean orifice hole and inner part of the valve with a toothpick being careful not to enlarge the orifice hole.
- Before reinstalling the hex head orifice to the valve stem, use a quick burst of gas pressure by turning the valve on then off to remove any loose debris.
- When replacing the burner/venturi assembly, be sure the venturis fit over the gas valve orifices.
- Reinstall the clips under the grill to hold the burner in place.
This is called a Flashback. Flashbacks are caused by an obstruction in either your venturi tubes or in the orifices.
To convert a JNR, WNK or TJK from one gas type to another you will need to replace the entire valve assembly (which includes the correct orifice).
- If you were only to only change the orifice on your valve, you will not have control over the variable heat settings on your grill because internally the valves are tooled differently per gas type. Your grill will burn on high at all times and you will not be able to turn it to low.
- If you are unsure, please contact our knowledgeable staff to determine which conversion kit you will need for your conversion.
You should never put food over your infrared burner if the burner is not lit.
The infra-red burners are designed to incinerate the drippings from your food. If the burner is not turned on this drippings will rest on your burner and clog the burner preventing proper air flow the next time you use your grill preventing the infra-red burner for working properly. In some cases, this will cause the ceramics to crack resulting in the need for a new burner.
You will need to get your infrared burner replaced.
You will want to clean out your infrared burner venturi with the venturi tube cleaner that was supplied with your grill. If you experience the same popping when you reinstall your burner it may be that you have a cracked ceramic or broken seal. If this is the case, you will need to replace your infrared burner with a new one.
You should not wash your briquettes with soap and water.
Because your Flavormaster briquettes are made of porcelain the water will cause your briquettes to shatter if not thoroughly dry before using. Your self-cleaning Flavormaster briquettes are designed to be flipped over once or twice a season where any food debris will cook off.
No, you should not use compressed air—by using the air you are not removing the obstruction just blowing it out of the way. Instead, you will want to use the provided venturi tube brush to clean your venturis.
Because these burners are constructed of cast stainless steel, over time you may notice the portholes are closing up due to calcification. To keep your burner working properly year after year you will want to inspect these burners each season and clean off all of the calcification with a wire brush. If you have neglected to do this grill maintenance you may notice your ports are severely clogged and you can attempt to unclog each of these ports by either drilling them out with a drill or the use of a sandblaster.
While your grill is turned off you can try removing your knobs and spray a lubricant directly on the valve stems. You can then replace your knobs and work the lubricant into your valve by pushing in the knob and turning back and forth several times. If you notice that the valve is still difficult to turn you will need to replace your valve.
If you have any questions or concerns about your grill, please do not hesitate to contact one of our knowledgeable customer service agents.

There are several ways you can clean your stainless steel cooking grids.
- You can use a brass bristle brush or balled up aluminum foil to scrap and clean your grids when they are hot.
- You can use hot soapy water to soak your grids and then use a nylon scrubby pad.
- You can also use oven cleaner to clean your grids.
- You can put the cooking grids into a large black plastic garbage bag, add enough vinegar to cover your grids, seal the garbage bag and then place in the hot sun for several hours. When you take the grids out you can wash them with hot soapy water and a nylon scrubby to remove any additional debris.
- DO NOT put your grids in a self-cleaning oven.
The first time you use your SearMagic grids you will want to run your grill on high to burn off any oils that may be on your grids.
Because your grids do not have a non-stick coating on them, here are a couple of suggestions to get the most out of your first SearMagic grilling experience.
- The best thing to cook on your grids to get them seasoned would be something that has a higher fat content like burgers. The fat in the burgers will help to season your grids for future grilling. The more you use them the better they get.
- When grilling something like boneless, skinless chicken breasts you should coat your chicken with something like light olive oil to prevent your chicken from sticking.
If you have any questions or concerns about your SearMagic grids, please do not hesitate to contact one of our knowledgeable customer service agents.
Yes, SearMagic grids can warp.
Warping is usually caused by cooking with a burner that has a split in the seam, allowing a larger flame to come through at the split. This is called a hot spot. When a burner starts to split, it needs to be replaced. Otherwise, the cooking grids will continue to warp.
How do I fix warped SearMagic Cooking Grids?
To fix warped SearMagic cooking grids, you will need to heat them in the grill on high for about 10 to 15 minutes. Using oven mitts, remove your grids one at a time and wrap in an old towel. Next set them on a flat surface such as a sidewalk and press down on the high spots until flat. You may need to repeat this process several times depending on how severe the warping has become.
The way to keep the cooking grids from warping again is to be sure to inspect your burner at the beginning of each grilling season and replace the burner if the seam starts to split.
The warranty covers the cooking grids against a manufacturing defect, such as a weld pop. The warranty specifically excludes warping, which is explained in the Maintenance section of the owners’ manual.
No, you should not put your cooking grids in the dishwasher or self-cleaning oven.
Your cooking grids are full of debris and will potentially ruin your dishwasher and the high temperatures of the heat drying cycle could potentially warp your grids. The extreme temperatures of the self-cleaning cycle in your oven could melt your SearMagic grids making them unusable.
DO NOT use oven cleaner on your SearMagic grids either. This will pit the metal and jeopardize the integrity of the grid.
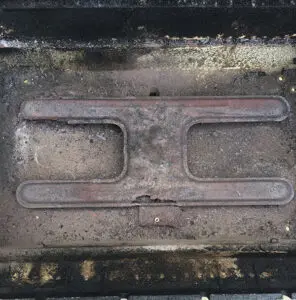
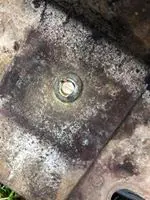
Due to the intense heat that is generated by the burner ignitor boxes can prove to be quite difficult to remove. Over time the nut that holds the ignitor box in can become corroded and hermetically sealed to your bottom casting. Below are a some recommended steps to assist in successfully removing your GGIB.
- First, soak the nuts on both the underside and inside of your bottom casting with a penetrating oil like WD-40 or Liquid Wrench. Let this soak for several hours and you may want to give these areas a couple of doses of the penetrating oil.
- If you have not been able to remove the ignitor box after soaking in penetrating oil you can try tapping or chiseling it out.
- Another suggestion to remove a stubborn ignitor box is to drill it out once the majority of the part has been removed. Below is a photo of what should be left before attempting to drill this out.
No, there is no coating on the SearMagic cooking grids.
You can use a brass bristle brush to clean SearMagic cooking grids when the grids are hot. When the grids are cold, you can soak them in a Rubbermaid-type container filled with hot water and a grease-cutting dish soap like Dawn, and then scrub with a brass bristle brush or a nylon dish scrubbie.
Every time you use your grill, you can take the grid on the left, flip it over, and move it to the right end of the grill, and slide the other grid(s) over to the left, and then pre-heat the grill for 10 minutes on high. Also, heat the grill to high and let it run for 10 minutes after you finish cooking. This will help to burn off anything that has dripped onto the grids.
There is a wood scraping tool (GGWB5), which is like a large wooden two-tined fork, which is designed to help remove clumps of food, marinades, etc. from between the ridges on the SearMagic cooking grids. There is also a narrow, brass bristle brush (GGWB10) which is designed to fit between the ridges on the SearMagic cooking grids.
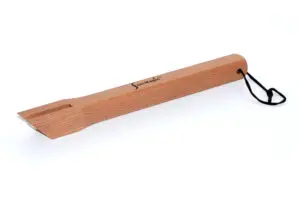
GGWB5
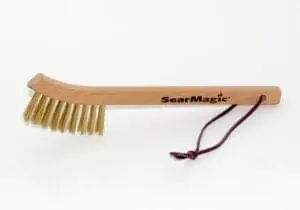
GGWB10
ProFire
Each burner has its own orifice. Replacing each orifice is pretty straightforward and easy to do.
- Remove the burner and remove orifice.
- Install correct orifice.
- Reinstall burner.
On older models, it is on the left inner wall of the grill. On current models, it is on the bottom side of the drip pan.
The battery may need replacing. Unscrew the ignitor button, replace AAA battery.
To remove grease build-up, use Simple Green. or a similar product. After grease is removed, use an oil-based stainless polish. For discoloration and burnt-on stains, MHP Stainless Steel Grill Cleaner (SCC) can be used.
Do not use steel wool.
Yes, discoloration from the intense heat and grease build-up is normal and is not covered under the warranty.
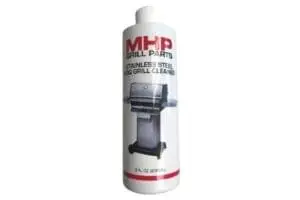
SCC | Stainless Steel Grill Cleaner
Discoloration and burnt-on stains can be removed with the MHP Stainless Steel Grill Cleaner (SCC). Follow the directions exactly on the back of the bottle and rub with the grain of the stainless.
Never use steel wool to clean a stainless steel grill.
On grills purchased after April 1, 2018. Grills purchased before April 1, 2018 fall under our original lifetime warranty.
You can use a brass bristle brush to clean SearMagic cooking grids when the grids are hot. When the grids are cold, you can soak them in a Rubbermaid-type container filled with hot water and a grease-cutting dish soap like Dawn, and then scrub with a brass bristle brush or a nylon dish scrubbie.
Every time you use your grill, you can take the grid on the left, flip it over, move it to the right end of the grill, slide the other grid(s) over to the left, and then pre-heat the grill for 10 minutes on high. Also, heat the grill to high and let it run for 10 minutes after you finish cooking. This will help to burn off anything that has dripped onto the grids.
There is a wood scraping tool (GGWB5), which is like a large wooden two-tined fork, which is designed to help remove clumps of food, marinades, etc. from between the ridges on the SearMagic cooking grids. There is also a narrow, brass bristle brush (GGWB10) which is designed to fit between the ridges on the SearMagic cooking grids.
GGWB5
GGWB10
Phoenix
Yes, the new cast aluminum drip pan has the same specs as the original drip pan only now it’s made out of cast aluminum.
No, the valves do not have the same specs.
The battery may need to be replaced. Unscrew the ignitor button, and replace it with an AAA battery—positive end down.
The serial number is located on the left end cap of the control panel.
SCC | Stainless Steel Cleaner
Discoloration and burnt-on stains can be removed with the MHP stainless steel cleaner (SCC). Follow the directions exactly on the back of the bottle and rub with the grain of the stainless.
Never use steel wool to clean a stainless steel grill.
To remove the grease build up first use Simple Green, or a similar product, with a soft cloth rubbing with the grain. After grease is removed, use an oil-based stainless polish and a clean cloth, again rubbing with the grain.
Yes, discoloration from the intense heat and grease build-up is normal and is not covered under the warranty.
Phoenix grills have an expected temperature range between 225˚ – 450˚. However, remember weather conditions factor into the performance of any grill.
Everglow Lighting